Oil analysis success hinges on the quality of the oil sample. Drawing a representative oil sample involves a combination of factors, including selecting the right location, deploying the right method, using the right hardware, determining the right sampling frequency, and providing relevant and accurate labeling.
This article is dedicated to the process of oil sampling using vacuum pumps. We will explore the steps in conducting successful oil sampling with a vacuum pump, shed light on the complexities and challenges surrounding this critical task, and suggest some tips to overcome these limitations.
The Importance of a Representative Sample
Before we dive into the specifics of vacuum pump oil sampling, let’s review why representative oil sampling is essential.
To ensure the data derived from oil analysis is reliable and actionable, the collected samples must accurately represent the condition of the entire system. This brings us to the primary concerns of maximum data density and minimum data disturbance.
The ISO 14830 standard states that maximum data density is the most possible information contained per sample unit volume [1]. This implies that the sample must have a sufficient concentration of all existing kinds of contaminants, wear debris, and other analytes of interest.
The density ensures that any abnormalities or deteriorations in the equipment can be detected early, allowing for proactive maintenance.
On the other hand, the same standard says minimum data disturbance is when information is uniform, consistent, and unaltered by the process [1]. Using permanently installed sample ports is always best to avoid data disturbance. Variability (data disturbance) can occur whenever a permanently installed sample collection port, including drop tube and drain port sample collection, is not used.
Oil Sampling Techniques
There are typically three available options for drawing an oil sample from machinery or equipment:
Sampling Valve
Not all equipment has a sampling valve installed correctly in a turbulent zone in the return line before the filter. Some machines are equipped with sampling valves which offer a reliable and convenient way to draw a representative oil sample.
Otherwise, evaluate equipment design and consider retrofitting with sampling valves or creating better access points to facilitate sampling. For future equipment orders, during the design phase, and when building specifications, consider future oil sampling and request that the OEM install a sampling valve in the best possible location.
Drain Valve
The drain valve can be used if the equipment does not have a sampling valve installed. But this is the least recommended sampling location. It is impossible to ensure that the extracted oil sample is representative, as the oil at the bottom may differ in composition from that higher up in the reservoir.
The only option to ensure drawing a representative sample from the drain valve is to use a drain port adapter that places a formed steel tube into the correct location in the reservoir. Thus, in addition to the drain, the drain valve will ensure a second function: getting an oil sample from a desired location inside the reservoir.
Vacuum Pump
In case there is no sampling valve located in a turbulent zone, or it is not practical for use due to obstructions or safety concerns, a drop tube with a vacuum pump can serve as a marginal alternative to extract the oil sample. This sampling technique offers the ability to get the oil sample from various locations within the equipment.
However, knowing the data disturbance constraints linked to this method is crucial. In the subsequent sections, we discuss how to use a vacuum pump to draw a representative oil sample from equipment and explore how to mitigate potential errors when using this method.
Process for Vacuum Pump Oil Sampling
Oil sampling with a vacuum pump involves a series of steps to ensure that the collected sample is representative and uncontaminated.
The best possible sample result using a sample gun (vacuum pump) is achieved by installing an internal ‘pitot’ tube to ensure that the sample entering the sample bottle is always precisely from the same location within the machine. The image below demonstrates what the installation should look like upon completion.
The end of the tube should be at a minimum of 75 millimeters/3 inches above the bottom and away from a vertical sump wall. If possible, permanent tubes should also be formed so that the internal pipe opening is placed in the dynamically moving body of oil within the machine.
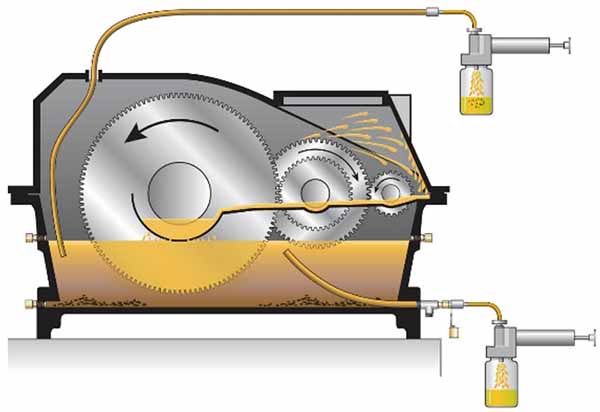
Example of the fixed tube positioning vs. using a sample gun with a flexible plastic tube.
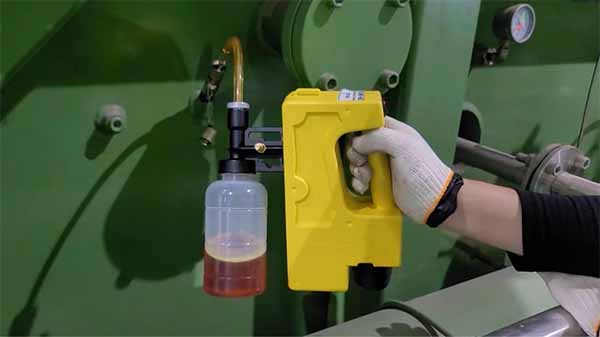
Before starting the oil sampling procedure, gather all necessary tools, including a vacuum pump, sampling bottles, suction tube reel, gloves, and all required PPEs. Begin by inspecting the vacuum pump to ensure it is clean and in good working condition. Any contamination present on the pump could introduce errors into the sample.
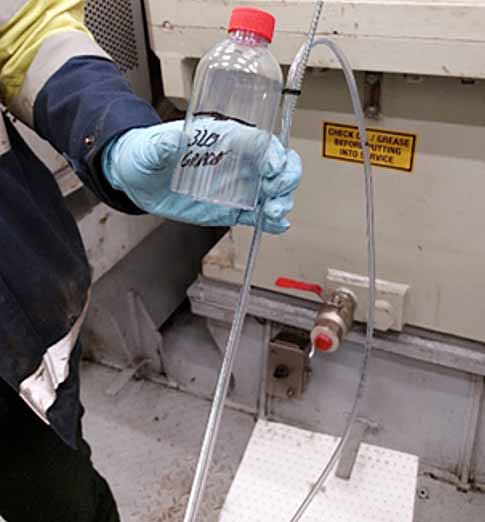
In this picture, the technician has worn his gloves and prepared the sampling kit before starting the operation. The sampling bottle is still sealed and will be opened at the exact moment when the sample is extracted. The oil sampled is an ISO VG 320, so the bottle should be filled to 50%. The technician has marked the ullage to be left in the bottle to allow the proper preparation of the sample once it arrives at the lab. Additionally, the suction tube is cut to the desired length and fastened to a rod to reach the desired location in the tank.
Once the preliminary preparation is completed, the following steps apply to various scenarios: splash-lubricated gearboxes, bath-lubricated equipment, and reservoirs.
- Step 1: Ensure the equipment to be sampled is in operation or has recently been operated to collect a representative sample. Equipment should have been operated in its typical working conditions (temperatures, loads, pressures, speeds, and level) for at least one hour before extracting an oil sample. Samples should not be taken when the equipment is cold, idle, or has not been running. Additionally, avoid lubrication starvation by checking the oil level indicator and confirming it is at the required level when drawing the sample.
- Step 2: Identify the sampling point and ensure it is clean and accessible. The sample point could be the filling point, the breather, or the dipstick. Clean the sample point with a lint-free cloth. Taking a routine sample from the same location each time is highly recommended to guarantee consistent sampling.
- Step 3: Cut the new sample tube to the desired length, ensuring that the tube length allows the vacuum pump to be horizontal during sampling. The drop tube length should be the same every time you take a sample.
- Step 4: Insert the sample tube into the metallic disk on top of the vacuum pump so that the tube extends approximately ½ inch from the bottom and tighten the metallic disk to secure the tubing.
- Step 5: Remove the waste bottle cap and affix the bottle to the vacuum pump to ensure drop tube flushing.
- Step 6: Insert the tubing into the sampling point cautiously, being vigilant to prevent the tube from touching any surface or internal components, such as gears, in the case of a splash-lubricated gearbox. Ensure that the tubing reaches the desired depth within the equipment, positioning the tubing tip at the midpoint of the existing oil volume in the reservoir.
- Step 7: Start the vacuum pump to create a controlled vacuum within the sampling container and the tubing by pulling the pump handle 1 to 3 times. Allow the sample bottle to fill to the ullage mark. There is no need to keep pulling the handle.
- Step 8: Discard the waste bottle and connect the vacuum pump to the sampling bottle. The lid should be kept sealed until ready for use to prevent contamination of the oil sample. Ensure the sample bottle is appropriately labeled and matches the sample ID tag on the equipment sampling location.
- Step 9: Operate the vacuum pump to draw the oil into the sample bottle, ensuring that the bottle is filled to the recommended level, which varies depending on viscosity. Once the desired sample volume is achieved, use the pressure relief button on the sample gun or loosen the bottle to release the vacuum and stop the flow.
- Step 10: Remove the sample bottle from the pump and securely seal it to prevent contamination.
- Step 11: Take the used sample tubing out of the pump and dispose of it properly. Do not reuse the tubes.
- Step 12: Use a clean, lint-free cloth to wipe down the vacuum pump, removing any trace of oil. Ensure that any spilled lubricant is cleaned up thoroughly.
- Step 13: Complete the sample label and documentation with relevant and essential information. For a more in-depth understanding of sample identification best practices, refer to the article: Oil Analysis Blunders: How to Avoid Mistakes in Sample Identification, which offers comprehensive insights.
- Step 14: Package the sample to prevent contamination and store it in a clean and secure container for safe transportation to the laboratory.
It is highly recommended to have a specific Standard Operating Procedure (SOP) for each machine monitored by oil analysis. This SOP should be documented and followed each time by all members of the oil analysis team.
Limitations of Vacuum Pump Sampling
While vacuum pump oil sampling is an alternative when well-located sampling fittings are not installed, it has limitations. There are several challenges, including:
Questionable Cleanliness
The vacuum pump-based sampling method requires, in addition to the vacuum pump itself, a suction tube and plastic bottles. All three components must be handled carefully to maintain integrity and prevent contamination. The vacuum pump should be securely protected within a plastic bag to ensure this.
The same level of protection should extend to the drop tube reel and the plastic bottles. Furthermore, these containers must remain sealed and unopened until the precise moment they are needed for sampling. Unfortunately, it is common to overlook the proper storage conditions of the sampling kit.
The objective of the fifth step of the procedure outlined above is to remedy this neglect by using a waste bottle to flush the internal steel (pitot tube) and external plastic suction tube before collecting the sample to be analyzed.
Unfortunately, sometimes maintenance personnel don’t understand the importance of thoroughly flushing the sample pathway and collecting the sample without flushing. This oversight can affect the cleanliness and reliability of the obtained samples.
Questionable Consistency
Consistency in sampling means that the oil sample is extracted from the same location using the chosen method at each sampling operation.
With the vacuum pump technique, the sampling personnel inserts the suction tube into the reservoir, typically through a breather port, and even if they precisely measure the needed length of the tube and insert it as required, this does not guarantee repeatability and optimum results.
Without exceptional attention to detail, it is tough to ensure that the flexible plastic tube reaches the exact and desired location to collect the oil sample. This depends on the quality of the plastic tubing, its length, and the oil temperature.
When a ‘fixed sample port’ installation is impossible, the drop-tube sampling process should be enhanced to ensure that the tubing consistently reaches the desired sump depth and location. This can be done by affixing the sample tube to a rigid item like a rod or attaching a weight to the tube.
Be sure to rinse the rod or weight before and after each use. Use a solvent and allow it to evaporate at room temperature. This precautionary measure helps to avoid cross-contamination and maintains the integrity and reliability of the sampling process.
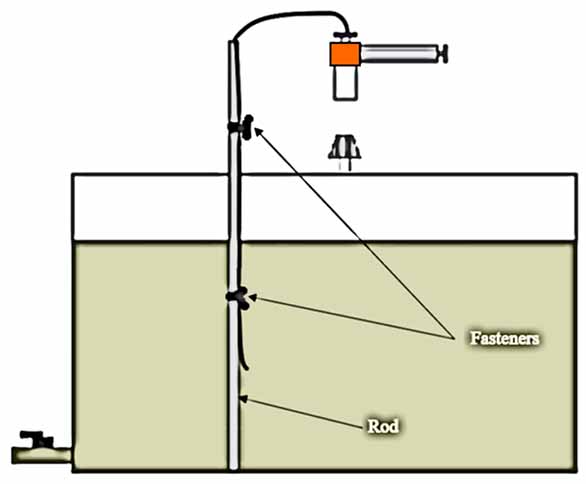
Oil sampling using a vacuum pump sampling with a drop tube top-fastened to a rod to allow extracting the oil sample from the desired location.
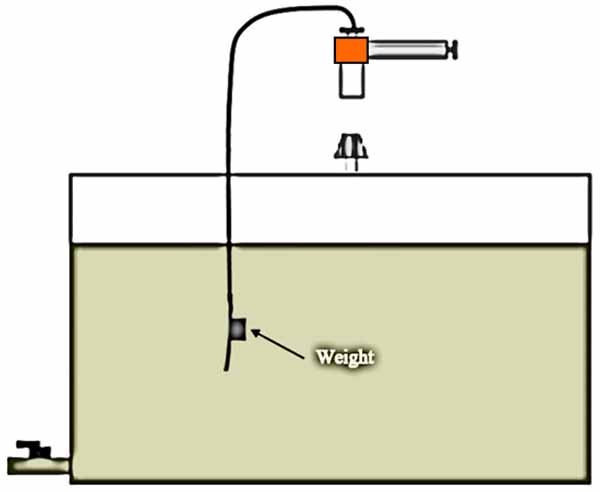
Oil sampling using a vacuum pump sampling with a drop tube top-fastened to a weight to allow extracting the oil sample from the desired location.
Contamination Likelihood
To extract an oil sample using a vacuum pump, we typically need to remove breathers, dismantle filters installed in the filling points, pull the dipstick, or even sometimes open manholes. Although these actions are performed with meticulous care and respect for established procedures, contaminants can always get in during sampling, particularly with wind or rain. Consider cleaning the sampling location properly with a clean rag and deploy protective measures for equipment installed in an uncovered area in case of bad weather.
Motorized Oil Sample Vacuum Pumps
Integrating a battery motor-driven vacuum pump into your oil sampling program is a strategic investment for monitoring lubricant and equipment health. With prices starting as low as $100, these motorized vacuum pumps can bring a cost-effective solution to the oil analysis team that can yield substantial benefits.
Many advantages include enhanced service levels, improved efficiency, and heightened overall effectiveness. These benefits stem from the user-friendly features of motorized vacuum pumps, such as their convenience, robust design with a one-handed grip, and the simplicity of a one-touch operating switch.
The integrated speed control valve allows for precise adjustments in sampling speed, making it adaptable to various scenarios, even in confined spaces.
Moreover, this technology enables efficient sampling with a single worker, reducing labor requirements and increasing productivity. The speed and efficiency of the process are further highlighted by the rapid sampling time, making motorized vacuum pumps an exciting tool for those committed to monitoring the health of their lubricants and equipment.
In conclusion, a repeatable and representative oil sample is the foundation of a practical oil analysis for predictive and condition-based maintenance. Analysis results interpretation is only valid if samples are collected in a repeatable manner and are representative of the lubricant under operating conditions.
Errors in obtaining samples impair all further analytical efforts [1]. Central to a representative oil sample is achieving maximum data density and minimum data disturbance. By mastering drawing oil samples with vacuum pumps while acknowledging their limitations, maintenance professionals can ensure that their oil sampling process is reliable to achieve oil analysis program objectives.
References
[1] ISO 14 830-1:2019: Condition monitoring and diagnostics of machine systems — Tribology-based monitoring and diagnostics — Part 1: General requirements and guidelines.